Backgammon: Hitting vs Playing Safe
BlogBackgammon: Hitting vs Playing Safe
Every time you roll the dice, some moves hit. Some moves play safe. Some do both. Choosing between them is the most frequent decision in backgammon, and getting better at this one choice is the fastest way to improve your results.
Here's the thing to keep in mind: the goal is never simply to hit or simply to play safe. You're looking for the move that gives you the best winning chances from the current position forward. Sometimes that means hitting and accepting the risk of a return shot. Sometimes it means playing quietly and letting your positional advantage do the work. Don't worry if this feels tricky at first. It gets much more intuitive with practice.
Understanding the Basics: Blots, Hits, and Safety
A blot is a single checker on a point, and it's vulnerable to being hit. Every move you make involves a choice about where to place (or avoid placing) blots.
Think of playing style as a dial, not a switch. On one end, loose play means leaving blots in order to build structure, gain tempo, or reach key points. On the other, tight play means avoiding blots at almost any cost, prioritising immediate safety. Neither extreme is correct all the time. The right setting depends entirely on the position.
The Golden Rule: The Pip Count
The pip count is the first thing to check before making the hitting decision:
If you're ahead in the race: lean toward safety. Break contact, consolidate your checkers, and head home. Getting hit when you're winning the race gives your opponent a free chance to catch up.
If you're behind in the race: lean toward aggression. Playing safe when you're losing the race is a strategy for losing slowly. You need to hit something to change the dynamic of the game.
Start here every time. Board structure and the specific game plan can override this, but the pip count is always your first check.
When to Be Aggressive: The Art of Hitting
The Tempo Hit
A tempo hit sends an opponent's checker to the bar, forcing them to spend their next turn re-entering instead of building their position. Even if the hit doesn't gain you a lasting material advantage, it buys you time. Picture this: your opponent is one roll away from making their 5-point. A well-timed hit makes them deal with the bar instead. That's a tempo hit doing its job.
Slotting and Building
Slotting means leaving a blot on a point you want to make, betting that you can cover it next turn. Slot when the target point is valuable enough to justify the risk. Avoid slotting when the opponent has a strong home board, because getting hit against a board with four or five made points is devastating.
Note the difference between slotting and splitting. Slotting places a blot on a point you want to make (usually in your own home board or outer board). Splitting moves one of your back checkers to fight for an anchor in the opponent's board. Both leave blots, but they serve different purposes.
The Blitz
When the opponent has checkers exposed in your home board, hitting them and closing points creates a blitz. The goal is to keep them on the bar while you shut the door. A successful blitz wins gammons. A failed one leaves you with scattered checkers, so recognising when to switch from attacking to consolidating is the key.
When to Play Safe: Defensive Fundamentals
The Return Shot Danger
Before hitting, look at the opponent's home board. If they have four or five points made, getting hit in return is catastrophic: you re-enter with limited options and the opponent has the structure to trap you. Against a strong opponent board, play safe unless the payoff for hitting is enormous.
Clearing Points Safely
When you're ahead in the race and bearing your checkers in toward home, clear your outer board points from back to front. Avoid leaving a blot that gives the opponent a shot to hit you back into the game.
The Stacking Trap
It's really common to avoid blots by stacking extra checkers on points you already own. It feels safe in the moment, but it's actually a trap. Stacking creates tall, inflexible columns (sometimes called candlesticks) that waste checkers. Five checkers on the 6-point gives you one safe point and four checkers doing nothing. Spreading those checkers out to make new points is stronger, even if it means leaving temporary blots.
Evaluating Risk: Math and Board Vision
Direct Shots vs. Indirect Shots
The distance between your blot and the nearest opponent checker determines how likely you are to get hit:
Direct shot (1 to 6 points away): the opponent can hit you with a single die. The probability ranges from roughly 30% to 50% depending on the exact distance and any blocking points in between.
Indirect shot (7 or more points away): the opponent needs the combination of both dice to reach you. The probability is significantly lower.
One extra point of distance makes a meaningful difference. A blot sitting 7 points away is substantially safer than one sitting 6 points away.
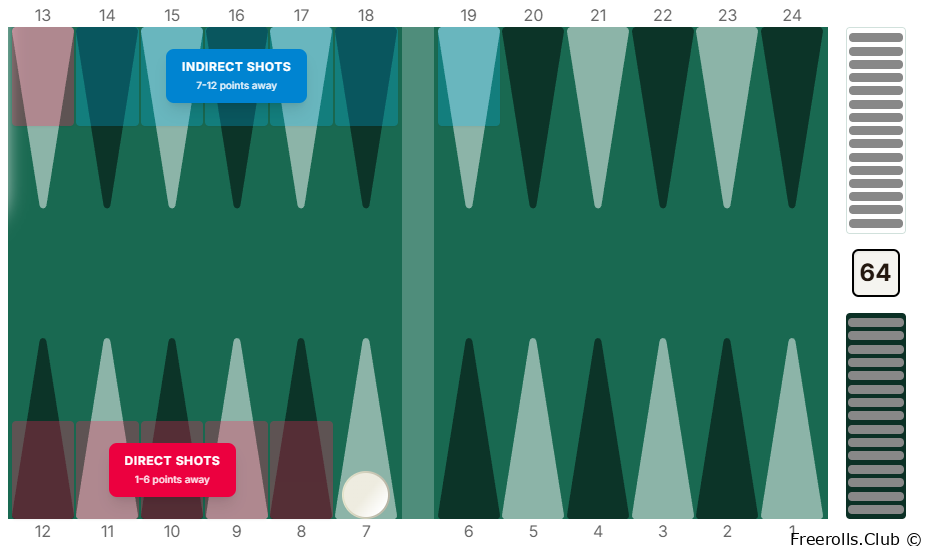
Direct shots (1–6 points away) can be hit with a single die. Indirect shots (7–12 away) need both dice to combine. One extra point of distance makes a big difference.
Duplication
Duplication means forcing the opponent to need the same die number for two different good moves. If hitting your blot requires a 4 and making their key point also requires a 4, they can't do both. Their good numbers overlap, and their effective options shrink. When you have a choice of where to leave a blot, pick the spot that duplicates the opponent's best numbers.
on website to post or comment You can register HERE